


Are you ready to embark on a green journey that is not only delicious but also incredibly rewarding? Look no further than growing your own broccoli microgreens! These vibrant and flavorful greens are not only a feast for the taste buds but also a feast for the eyes. In this exciting guide, we will take you through the easy steps to grow broccoli microgreens, turning your gardening experience into a fun and entertaining adventure!
Supplies to Gather:
To kickstart your broccoli microgreen adventure, gather the following supplies:
- Broccoli microgreen seeds: Choose high-quality cress seeds specifically meant for growing microgreens. Look for non-GMO varieties for the best results. One great option is to visit our FarmerValley store, where we offer a wide selection of heirloom microgreen seeds, including broccoli. Our seeds are carefully sourced and of the highest quality, ensuring a successful and flavorful microgreen growing experience. So, head over to FarmerValley and explore our collection of cress microgreen seeds to kickstart your fresh and vibrant journey of homegrown microgreens.
- Growing mat or tray: Choose a growing mat or tray designed for microgreen cultivation. These mats provide an ideal environment for seed germination and root development. If you can’t find a growing mat, you can use shallow trays or containers with drainage holes.
- Container for growing: Select a container that accommodates the size of your growing mat or tray. It should be sturdy, clean, and able to hold the growing medium and seeds securely. Consider using recycled containers or repurposed items to reduce waste.
- Water source: Ensure you have access to a water source for soaking the seeds, misting the microgreens, and providing regular hydration throughout the growing process. You can use tap water, but if it’s high in chlorine or other chemicals, consider using filtered or dechlorinated water.
- Spray bottle for misting: A spray bottle is essential for misting microgreens and maintaining moisture levels. Choose a bottle with a fine misting nozzle to ensure an even distribution of water without damaging the delicate seedlings.
- Scissors or sharp knife for harvesting: When it’s time to harvest your microgreens, you’ll need a clean and sharp tool for precision cutting. Scissors or a sharp knife work well to ensure clean cuts and minimal disturbance to the remaining crop.
Preparation to Plant Broccoli Microgreens:
Before you start planting your broccoli microgreen seeds, make sure to prepare the growing area:
- Clean and sanitize: Thoroughly clean the container, growing mat or tray, and any gardening tools you’ll be using. Sanitization helps prevent the growth of harmful bacteria or fungi that could affect the microgreens.
- Prepare the growing mat or tray: If you’re using a growing mat, ensure it fits snugly inside the container and covers the entire surface area. If using a tray, fill it with a suitable growing medium like peat moss, coconut coir, or soilless seed-starting mix. Moisten the growing medium with water, ensuring it’s evenly damp but not soaked.
Step-by-Step Guide to Growing Broccoli Microgreens
Follow these simple steps to cultivate vibrant and healthy broccoli microgreens:
Step 1: Soak the Seeds
Start your microgreen adventure by giving your seeds a refreshing soak for 8-12 hours. Just like a swim in a crystal-clear pool, this step helps the seeds wake up and prepare for their journey towards becoming delicious microgreens.
Step 2: Prepare the Growing Container
Prepare the stage for your microgreens’ grand performance! Find a container that can hold the growing mat or tray. It’s like designing a set for a theatrical production. Fill the container with water, allowing the increasing mat to soak up the moisture. This is like giving your microgreens the perfect backstage environment to thrive.
Step 3: Spread the Seeds
It’s time for your seeds to show off their moves! Spread them evenly across the growing mat, like dancers gracefully taking their positions on stage. Create a visually stunning display, ensuring that the seeds have enough room to grow into vibrant microgreens.
Step 4: Keep the Container in Shade
Now, let the suspense build! Place the container in a shaded area, away from direct sunlight. It’s like keeping the microgreens hidden behind a curtain, allowing the magic of growth to happen backstage. The anticipation grows as you eagerly wait to see the first signs of life.
Step 5: Daily Moisture
Like a dedicated performer needs their daily dose of water, your microgreens need moisture to flourish. Lightly mist them once or twice a day, providing just the right amount of hydration. Think of it as giving your microgreens a refreshing drink to quench their green hope.
Pro Tip: Create a daily watering routine by setting a reminder on your phone or using a colorful calendar to keep track.
Step 6: Patience and Observation
Patience is key as you watch your microgreens grow. Observe them daily, like a curious scientist on a thrilling expedition. Witness their journey from tiny sprouts to magnificent green wonders. It’s an exciting adventure, and every day brings new surprises!
Pro Tip: Take photos of your microgreens’ progress. It’s a great way to document their growth and share your success with friends and family.
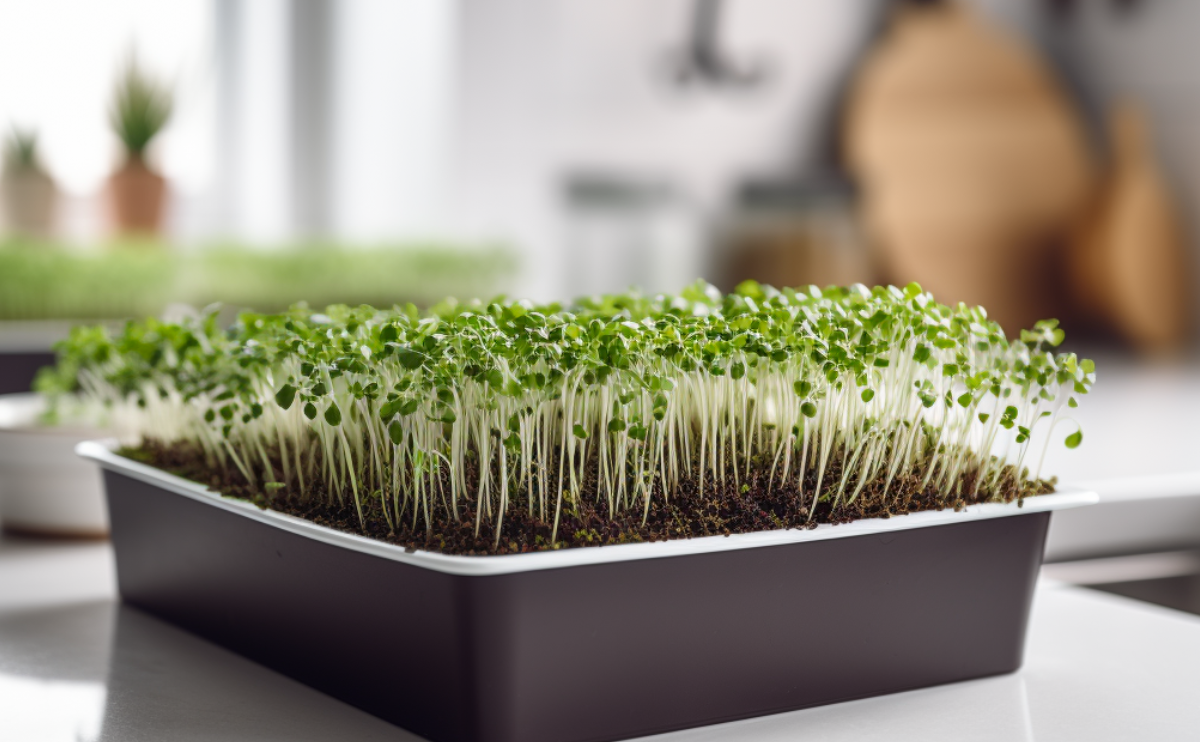
Step 7: Harvesting
It’s time to reap the rewards of your green journey! Once your microgreens have reached a height of 1-2 inches and developed their true leaves, they are ready to be harvested. Grab your scissors or a sharp knife and cut them just above the soil line. It’s like taking a bow after a stellar performance.
Step 8: Enjoy the Freshness of Broccoli Microgreens
Now that you’ve harvested your microgreens, it’s time to savor the freshness! These little wonders are packed with flavor and nutrition. Add them to salads, sandwiches, and smoothies, or use them as a vibrant garnish. Let your culinary creativity shine and explore the endless possibilities!
Pro Tip: Create a microgreen recipe collection to keep track of your favorite dishes and experiment with new flavor combinations.

Extra Delights: Utilizing the Growing Mat and Seedlings
Don’t let the journey end with the harvest! There’s more to explore:
- Reusing the Growing Mat: After harvesting, remove the remaining roots and any dried-up parts from the growing mat. Compost it or use it as an excellent addition to your garden soil to nourish future plants.
- Seedlings as Tasty Treats: If any seedlings have grown too close together, thin them out and use them in your culinary creations. It’s a bonus treat while you wait for the rest of the microgreens to mature.
Other Ways to Grow Broccoli Microgreens
While the steps mentioned above outline the traditional method of growing microgreens, there are other creative approaches you can explore:
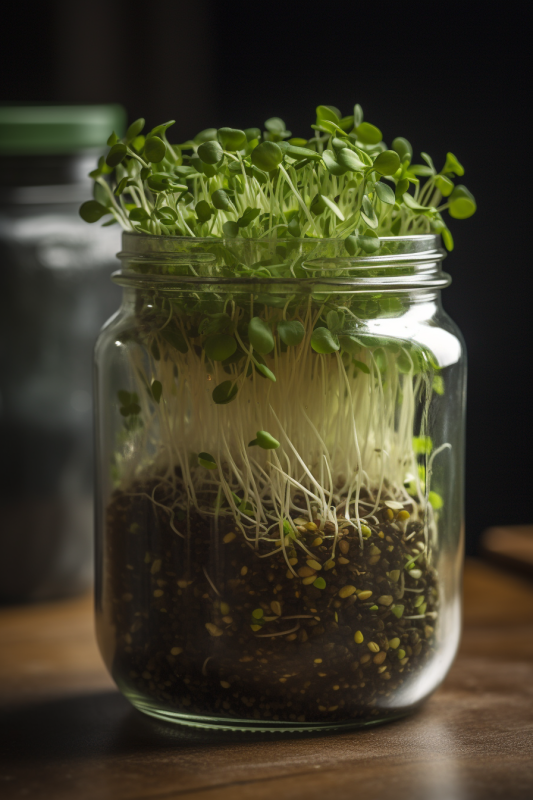
- Jar Sprouting: Place the soaked seeds in a jar with a sprouting lid or a piece of breathable fabric secured with a rubber band. Rinse and drain the seeds twice a day until they sprout. Once sprouted, transfer them to a tray or container with a growing medium to continue the growth process.
- Hydroponic Growing: Utilize a hydroponic system to grow your microgreens without soil. Set up a hydroponic tray with a nutrient-rich water solution and place your seeds on a growing medium like a coconut coir pad or a specialized hydroponic mat. Ensure the roots have access to the nutrient solution for healthy growth.
- Vertical Growing: Maximize your space by growing microgreens vertically. Install a vertical growing system or use shelves with grow lights to provide adequate light for the microgreens. This method allows you to grow a larger quantity of microgreens in a compact area.
Remember, each method may require specific equipment and adjustments to watering and lighting
Detailed Guides for Planting Vegetables, Herbs, Greens & Lettuce, Peppers, and Wildflowers:
At FarmerValley we offer detailed guides for planting vegetables, herbs, greens & lettuce, peppers, and wildflowers. These guides provide step-by-step instructions for planting and caring for your plants, as well as tips for getting the best results. Check our growing guides and plant your own non-GMO garden with confidence.
Planting non-GMO seeds is a great way to enjoy fresh and healthy vegetables and herbs while also knowing that you’re avoiding harmful additives. With these essential tips and top lists, as well as our detailed guides, you’ll be on your way to a bountiful harvest in no time.